

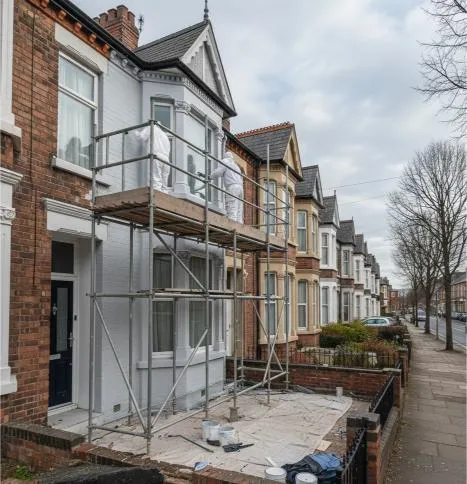
Painting pebbledash is mostly not painting. It is tapping, scraping, washing and waiting for a dry week. Get that preparation right and a rendered house stays crisp for years. Skip it, and the new coat lifts off in sheets, taking loose render with it.
Here is how our exterior painting team tackles pebbledash and smooth render on Manchester homes, from the first tap to the final coat.

In short
- Every wall is tapped first, and hollow render is repaired before any paint goes on.
- Green growth is killed with a fungicidal wash, not just jet-washed off.
- Chalky walls need a stabilising solution so new paint has something firm to grip.
- Pebbledash takes far more paint than smooth render, worked into every gap between the stones.
- Use a good microporous masonry paint on cement render, and a mineral paint or limewash on lime render.
- Paint only in dry, mild weather, and finish before evening dew lands on wet paint.
Why paint fails on pebbledash and render
Most failures on rendered walls are not paint failures. They are preparation failures, and the paint takes the blame. A coating is only ever as sound as the surface under it.
The same problems turn up on house after house in Manchester. There are 1930s semis whose pebbledash has been painted three or four times, with the bottom layers turning to powder. There are north-facing gables streaked green, and render cracked around the sills.
Westerly rain is driven into those cracks and freezes in winter. Slowly, the render loses its grip on the wall behind.
Start with a tap test for hollow render
First, every rendered wall is tapped. A knuckle works low down, and the handle of a small hammer higher up. Sound render gives a dull, solid knock. Blown render sounds hollow and drummy, and each patch is marked in chalk.
Other warning signs to look for:
- bulges, or render that flexes under hand pressure
- cracks that outline a patch, like the edge of a jigsaw piece
- bald areas where pebbledash stones have dropped off
- damp staining or green streaks below sills, gutters and downpipes
Painting pebbledash without that check is a gamble. Small blown patches are cut back to a sound edge and built up again in coats. On pebbledash, fresh stones are thrown onto the patch while the final coat is still wet. They rarely match the old dash exactly, which is one reason pebbledash gets painted at all.
Fresh render must cure and dry before it is painted, often for several weeks, so follow the manufacturer’s guidance. Where whole elevations sound hollow, that is a job for a specialist renderer, and the painting waits.
Fungicidal wash for algae and green growth
North-facing walls get little sun and dry slowly, as do walls shaded by trees. Across Manchester they grow algae, lichen and black mould, often in streaks beneath a dripping gutter.
Loose growth is brushed off first. A fungicidal wash, such as Dulux Trade Weathershield Multi-Surface Fungicidal Wash, is then applied generously. It is left to work for the time on the label, then brushed or rinsed off as directed.
A pressure washer only removes what you can see, so the green returns. On pebbledash it can also blast out stones and soak the wall. If one is used at all, it is kept at low pressure and the wall is left to dry.
Importantly, the cause is fixed too, whether that is a leaking gutter or a sill with no drip. If damp shows inside too, read why painting a damp wall is not the fix before anyone reaches for a roller.
Stabilising chalky and powdery surfaces
Old masonry paint breaks down in sunlight and rain, leaving a fine powder. Weak, sandy render does much the same. New paint will stick to that powder, not to the wall.
Two quick tests tell you where you stand:
- The rub test. Run a dark cloth across the wall. If it comes away white or coloured, the surface is chalking.
- The tape test. Press masking tape on firmly and pull it off sharply. Flakes on the tape mean poor adhesion.
Loose paint is scraped back, then a stabilising solution such as Dulux Trade Weathershield Stabilising Primer binds what remains. It should soak in, not sit on the surface as a glossy skin. This is a large part of our surface preparation and finishing work, and the stage most often skipped.
Repairing cracks before painting render
Hairline cracks are lightly raked out and filled with an exterior filler, or bridged by a fine-textured masonry paint. Wider cracks are raked out, dampened and filled with a suitable exterior repair mortar. Cracks around windows and doors are common, and they let rain straight in.
Get a surveyor or structural engineer to look before painting if cracks:
- step diagonally through the wall
- are noticeably wider at one end
- keep reopening after filling
- appear alongside doors or windows that have started to stick
Paint hides that evidence, so the assessment comes first.
Common render problems at a glance
| What you see | How it is checked | What happens before painting |
|---|---|---|
| Green or black growth | Streaks, often on north walls or under gutters | Fungicidal wash, left to work, then brushed or rinsed off |
| Chalky or flaking paint | Rub test and tape test | Scraped back to a firm edge, then stabilised |
| Hairline cracks | Inspection in low, raking light | Raked out and filled, or bridged with fine-textured paint |
| Wide or stepped cracks | Measured and watched over time | Surveyor or structural engineer first |
| Hollow or blown render | Tap test: a drummy, hollow sound | Cut out, repaired and left to cure |
| Missing pebbledash stones | Bald patches in the dash | Repaired and re-dashed, then painted to blend |
Smooth or textured masonry paint?
Smooth masonry paint gives a cleaner, more modern finish. It is easier to apply and recoat, and it sheds dirt better. Dulux Trade, Sandtex and Johnstone’s Trade all make proven versions.
Textured masonry paint contains a fine, sand-like aggregate. On smooth render it hides hairline cracks and patchy repairs well. However, it is heavier to apply and holds more dirt. On pebbledash, smooth is nearly always the right choice, because the stones already supply the texture.
Breathability matters, especially on older walls
Most modern masonry paints are microporous. They shed rain while letting some water vapour out. On cement render over a cavity wall, a good-quality masonry paint is usually a sound choice.
Older solid walls are different. Many were rendered in lime, which lets moisture move freely. Seal it under a heavy, low-permeability coating and moisture can build up behind. The result can be damp inside and render that fails in frost.
On lime render, therefore, a mineral silicate paint such as Keim, or a limewash, is the safer choice. Be wary of high-build coatings that promise very long life on a wall that needs to breathe. The same principle decides whether you should paint brickwork on an older house.
Unsure whether your render is cement or lime? Ask a surveyor before buying paint.
Painting pebbledash: rollers, brushes and sprayers
Pebbledash has far more surface area than smooth render. Paint must reach the sides and bases of every stone, not just the tops. Plan from the spreading rate the tin gives for rough surfaces, not the headline figure.
On porous or bare render, many manufacturers allow the first coat to be thinned with a little clean water. Check the tin first, because the ratio varies.
There are three main tools for the job:
- Extra-long-pile masonry roller. Loaded well and worked in several directions to push paint into the gaps.
- Masonry brush. Used to stipple paint into gaps the roller misses, and to cut in around windows and doors.
- Airless sprayer. Much faster on big elevations, but everything nearby needs masking, and spraying stops when the wind picks up.
Sprayed coats are usually back-rolled while wet, so the paint is driven into the dash rather than sitting on the stone tips. Work top down in manageable sections, keep a wet edge and break only at corners or downpipes. If fascias are being painted, they go first, so drips land on unpainted wall.
Afterwards, check each section from an angle. Missed pinholes between stones, known in the trade as holidays, show up badly in low sun. Two coats is the norm. Follow the manufacturer’s recoat time, typically a few hours for water-based masonry paint in mild weather.
Scaffolding and access on rendered houses
Gables and two-storey elevations need proper access. A ladder is fine for a look, but not for rolling pebbledash all day. Scaffolding also allows proper inspection. The worst render often sits at the top of the gable, where rain gets in along the roofline.
It should be put up by a professional scaffolding contractor. If it stands on a pavement, a council licence is needed, which the scaffolder normally arranges. On semis and terraces, talk to the neighbours early.
On sloping sites, our work on hillside homes and high-access exteriors in Mossley often means scaffold designed around steep gardens. For flats, shops and larger buildings, access is planned the same way through our residential and commercial painting service.
Weather, dew and timing
Masonry paint needs a dry wall, a dry forecast and mild temperatures. Most water-based masonry paints need air and surface temperatures above roughly 5 to 8°C while drying. The tin gives the exact figure. Pebbledash also holds water between its stones, so it needs longer to dry after rain.
Dew catches out more people than rain. In spring and autumn it forms as the air cools in the late afternoon. On soft paint it can leave sticky brown streaks, known as surfactant leaching.
As a result, work starts once the morning dew has lifted. It stops in time for the last coat to be touch-dry by evening.
Hot sun is a problem too. Paint dries too fast on a south-facing wall in summer, leaving lap marks, so the work follows the shade. For a month-by-month view, see our guide to the best time to paint a house exterior in the UK.
Where we draw the line
We will not paint over blown or hollow render. It is tapped, cut out and repaired first, every time.
Paint on hollow render looks perfect for a season. Then water gets behind it, the frost gets in, and the patch drops off with the new paint still attached. You end up paying for the painting twice.
DIY painting pebbledash is reasonable on a low garden wall or a bay you can reach safely from the ground. However, call a professional, or a surveyor, if:
- the work needs scaffolding or a tower
- tapping reveals hollow areas
- the render may be lime, or the house has solid walls
- cracks are wide, stepped or keep coming back
- chalking and flaking cover most of the wall
Get a free quote in Manchester
As house painters across Manchester, we handle painting pebbledash and render throughout the region. That ranges from whole-house kerb appeal refreshes in Wythenshawe to rendered semis around Bolton. Every house is different, so the price depends on condition, size and access.
We will visit, tap the walls and give you a free, no-obligation quote. Call 07835 733353, or send us your details through our contact page.
Frequently asked questions
Can you paint pebbledash?
Yes. Pebbledash takes masonry paint well once it is sound, clean and dry. The wall is tapped for hollow render first, green growth is killed with a fungicidal wash and chalky areas are stabilised. Two coats of smooth masonry paint are then worked into every gap between the stones, using a long-pile roller and a stiff brush, or an airless sprayer followed by back-rolling.
What is the best paint for pebbledash?
For most pebbledash on cement render, a good-quality smooth masonry paint is the right choice, because the stones already give the wall plenty of texture. Trade ranges from Dulux Trade, Sandtex and Johnstone’s Trade are widely used. If the render is lime, or the house has older solid walls, a breathable mineral silicate paint or a limewash is the safer option.
Why does pebbledash use so much paint?
Pebbledash has far more surface area than smooth render. The paint has to cover the sides and bases of every stone as well as the tops, and porous dash soaks up the first coat. Check the spreading rate the manufacturer gives for rough surfaces rather than the headline figure, and buy enough from the same batch to finish each elevation.
Should you pressure wash pebbledash before painting?
Be careful. A pressure washer removes visible dirt but leaves spores in the pores, so green growth returns. It can also knock stones out of the dash and drive water deep into the wall. A fungicidal wash and a stiff brush do a better job. If a washer is used, keep the pressure low and let the wall dry thoroughly before painting.
When is the best time of year to paint render in the UK?
In Manchester, the practical window is roughly late spring to early autumn, in settled, dry spells. The wall must be dry, no rain should be forecast, and temperatures need to stay above the minimum on the tin while the paint dries. In spring and autumn, start after the morning dew has lifted and finish early enough to avoid evening dew.
Do cracks in render need fixing before painting?
Yes. Hairline cracks are raked out and filled, or bridged with a fine-textured masonry paint. Wider cracks are repaired with an exterior mortar or filler, and hollow render is cut out and replaced. Cracks that step through the wall, widen at one end or keep reopening should be seen by a surveyor or structural engineer first, because paint hides the evidence.
